Filtration - Version 1
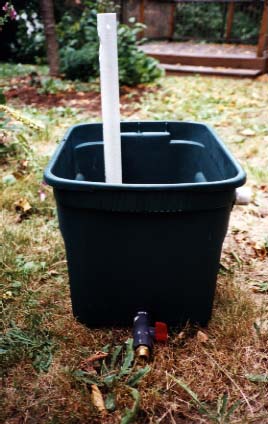
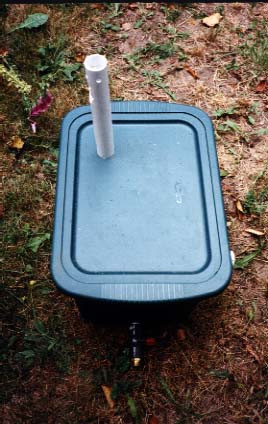
The filter for this pond is an upflow style built around a 33 gallon StacLite plastic container. I chose this container because of its strength and flat surfaces for connecting pipes. The Rubbemaid containers of the same size have too much flex too hold their shape very well when filled with water.
The flow from the pump enters an aeriation tower which allows the water to splash and mix with air before entering the filter. This provides the oxygen that the bacteria in the filter require. The tower then releases the water into the bottom of the filter in a settling space that traps the larger debris picked up by the pump. A drain is attached through the filter wall and has a garden hose fitting on it to make cleaning and draining easy. (Photo)
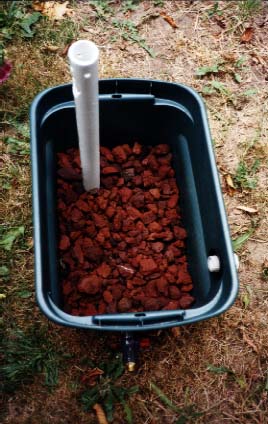
The water then flows up through a layer of bio-material where the bacteria form colonies. For this filter, I chose to use lava rock. It is inexpensive an works reasonably well. Make sure you wash it thoroughly (and then some more). The powdered lava that is all over it will turn you pond red in an instant if not removed. (Photo)
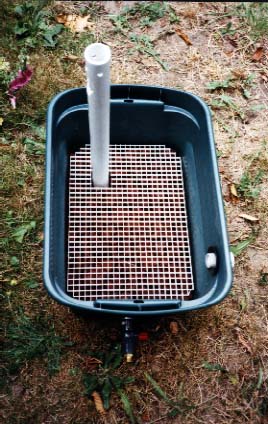
The lava is held in place by two shelves made of "egg-crate" flourescent light baffles. This stuff is white plastic that is approx 3/8 " thick with holes 1/2" square. It comes in sheets that are 2'x4' and can be found in most home improvement stores. (Photo)
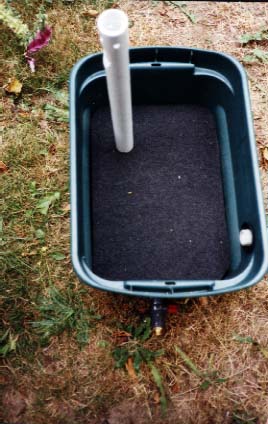
Next, the water flows through a filter mat that provides more space for bacteria to grow, but more importantly, it provides mechanical filtration to remove any large debris before it can return to the pond. Most pond supply stores sell this stuff. I comes in rolls that are 2' wide. You probably could also use airconditioner or heater filters as well. (Photo)
The shelves are supported by stands I made from 1/2" PVC pipe and tees. It is very inexpensive and can easily be made to any height required. Each corner is a tee standing upright. They are held in place by tees and pipes hooked together to form a shape like a capital "I". If it need to be taller that the height of a tee, just insert a short piece of pipe in the top or bottom of the tee to add height. (Photo)
Once the water reaches the top of the filter, it is fed by gravity through a pipe to the top of the waterfall. As it flows over the falls, it is again aeriated and then returns to the pond.
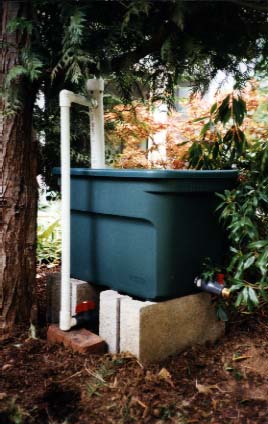
Here is a photo of the finished filter before installation. And here it is installed behind the falls. The pump sits on the bottom of the pond about 2/3 of the way down the pond from the falls. This provides for some circulation within the pond itself while still leaving the last 1/3 with very little current which is what lillies prefer (or so I've been told). The pump is sends water to the filter with a clear vinyl hose that is connected to a valve and PVC pipe that leads to the top of the aeriation tower. The valve allows control of the flow through the system and over the falls.
Cleaning
To clean the filter, turn off the pump, remove the lid and take out the filter mat. Most of the time, you can just hose off the mat, put it back in, and you are done. Every once in a while (depending on how much junk you have in your pond) you need to flush the settling chamber and wash the bio-material. To do this, just open the drain on the bottom. You can attach a hose and use it to water a bit of your garden with some great fertilizer. Once the filter is drained, use another hose attached to a spigot to spray clean water through the filter and flush it out. You don't want to spray so hard that you wash away the bacteria colonies, just enough to flush out the debris that has collected in the system. They greenish-brown "slime" that is on everything is the good stuff that you want to keep. When you are done, reassemble the filter and turn the pump back on.
